Saturday, April 18, 2020

Implementing Secure Client Verification (SCV) on Check Point gateways


Introduction


This post was written whilst organisations were coping with the fallout from the Corona / COVID-19 pandemic.  Organisations were faced with the task of enabling the workforce to work remotely, and to do so securely.  Apart from implementing MFA, device posturing or compliance checking your endpoints is arguably one of the more effective ways of helping to address the risks associated with granting your users access into your network.

Check Point allows us to do this in multiple ways by utilizing a feature called Secure Client Verification (SCV).  In very simple terms, this allows us to perform numerous checks (Is AV running, is the OS supported, is it patched, is it a member of the corporate domain etc.) on an endpoint before we allow it to access our network via a VPN.

SMS Configuration


Go to Global Properties - Secure Configuration Verification
Ensure "Apply Secure Configuration...." is selected

Gateway Configuration


On your Cluster / gateway object, ensure that IPSec Policy Server is selected.


This allows us to add the desktop policy to our policy package, which in turn allows the magic to happen.  Go to Security Policies -> Manage policies and layers.  Ensure "Desktop Security" is ticked.


Publish your changes and navigate to the policy package you just edited.  You'll see you have a brand new "Desktop Policy" in your Access Control section.  Click "Open Desktop Policy in SmartDashboard", making sure to select Read-Write mode.


Navigate to the "Desktop" tab.  We will need to create a rule here, otherwise the policy will fail to install (it's the policy installation that transfers the local.scv file to the gateway, but more on that later).

If you are just running the Check Point Mobile client then whatever you do here will have no impact, as this client does not have a firewall component.  That said, click "Add Rule at the Bottom" and add a rule, anything will do.


If you're running the full client then obviously don't do a rule which puts you at risk, but then you would probably also have rules in place already which obviates the need for this step.

Update the SMS with your changes and exit SmartDashboard


local.scv file details


Now comes the slightly archaic bit.  Your actual compliance rules in this instance are controlled by a text file called "local.scv" that resides on your SMS inside the $FWDIR/conf folder.  I'll include links to more extensive documentation at the end of the post, for this example I'll show how to check for domain membership (checkpoint.root in this example).  The desired outcome will be that if the VPN client is not a member of the checkpoint.root domain, then it will be denied access.

You can either edit the local.scv file in place using the vi editor, or transfer to your workstation and upload the edited file.  Here are the relevant edited sections:


: (RegMonitor
:type (plugin)
:parameters (
:string ("SYSTEM\CurrentControlSet\Services\Tcpip\Parameters\Domain=checkpoint.root")
:begin_admin (admin)
:send_log (alert)
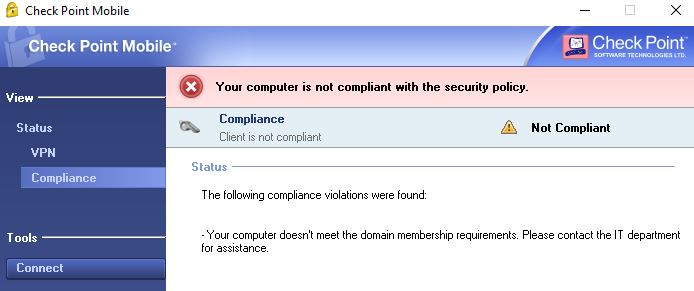
:mismatchmessage ("Your computer doesn't meet the domain membership requirements.")
:end (admin)
)
)


:SCVPolicy (
: (RegMonitor)


:SCVGlobalParams (
:enable_status_notifications (false)
:status_notifications_timeout (10)
:disconnect_when_not_verified (true)
:block_connections_on_unverified (false)
:scv_policy_timeout_hours (168)
:enforce_ip_forwarding (false)
:not_verified_script ("")
:not_verified_script_run_show (false)
:not_verified_script_run_admin (false)
:not_verified_script_run_always (false)
:allow_non_scv_clients (false)
:skip_firewall_enforcement_check (true)
)


Client Output


Once the updated file is saved on your SMS, you can push policy to your gateways, making sure the "Desktop Security" is ticked.  When policy installation is done you can attempt to establish a VPN connection to your gateway.  If you are not compliant you will get an error message similar to the below (you can edit the actual error message with the local.scv file)

Conclusion


The advantages to building and configuring Secure Compliance Verification is that you do not need to purchase any additional licenses or install any software beyond the Mobile Client.  The drawbacks, in my opinion is:
1.  Not as fully featured as the checks that can be done with the full Check Point endpoint solution
2.  You cannot have granular SCV rule (i.e. Check Y for UserA, Check Z for UserB)
3.  It's a Global setting enforced from your SMS, so you cannot have separate checks for separate gateways

Having said that, it's an awesome feature that for some reason is not very well-known among Check Point admins.

I found the following resources very helpful when first building this out in my lab:

Check Point sk65267
Check Point sk147416

https://community.checkpoint.com/t5/Remote-Access-Solutions/White-Paper-Check-Point-Compliance-Checking-with-Secure/m-p/57123#M1737


Friday, January 24, 2020

Migrating a Check Point cluster to new hardware

Overview:

The very high-level overview would be:
1. Migrate standby node config to new node
2. Disconnect old standby from network
3. Connect new standby to network
4. Reset SIC via SmartConsole
5. Failover Cluster to new node
6. Repeat steps 1-4 for additional cluster members

Step-by-Step

In order to minimise disruption we'll start by replacing the standby node.  We can verify the node state that with the cphaprob state command:

[Expert@gw02-r77:0]# cphaprob state

Cluster Mode:   High Availability (Active Up) with IGMP Membership

Number     Unique Address  Assigned Load   State

1          10.0.0.11       100%            Active
2 (local)  10.0.0.12       0%              Standby

Now we'll migrate the standby gateway configuration to our new standby node.  We can pull the existing config via the "show configuration" command.  This will dump the configuration onto the console, where you can copy and paste it into a text file:

gw02-r77> show configuration
#
# Configuration of gw02-r77
# Language version: 12.3v1
#
# Exported by admin on Thu Jan 16 09:46:32 2020
#
set net-access telnet off
set core-dump enable
set core-dump total 1000
set core-dump per_process 2
set inactivity-timeout 10
set web table-refresh-rate 15
set web session-timeout 10
set web ssl-port 443
set web ssl3-enabled off
set web daemon-enable on

Etc………………………………….

The next step is very important, as most likely your interface names will be different on your new hardware.  In the below example my source gateway's interface is eth0:

set interface eth0 comments "Management"
set interface eth0 state on
set interface eth0 ipv4-address 192.168.239.253 mask-length 24

If my destination interface is eth5, for example, I'll just do a simple search and replace, which will give me this:

set interface eth5 comments "Management"
set interface eth5 state on
set interface eth5 ipv4-address 192.168.239.253 mask-length 24

This we'll repeat for all interfaces.  Sub-interface names will not change, so you need not worry about those.

Now that we've adapted our config file to reflect our new hardware, we log into the new gateway and paste it in.

Now we are ready to replace our standby node with the new node, so we disconnect our standby node from the network.  To allow for rapid failback in case something goes wrong I never power off the old standby.  Instead I either unplug the cables or I disable the switchports that the gateway is connected to.

Now we can power up the new standby node.  Once bootup is complete we reset the SIC using SmartConsole.  Right click on your gateway object and select edit:


Now click Communications, then Click Reset:


Now enter the one-time password (should match what you entered during gateway setup, otherwise you can change it using cpconfig):


Now we update the cluster properties to the new version (R77.30 -> R80.30 in this instance)


What if my interface names are different?

In the event that your interfaces names are different between your old and your new cluster members, you'll need to match it up by editing your cluster object in SmartConsole and telling it which physical interfaces maps to which cluster interfaces.  This screenshot should explain it better:


Finally we install our policy on the new node only:


Now we fail the cluster over to our new member by running the cphastop command on the remaining "old" node.

We verify that our new member is active:

[Expert@gw01-r80:0]# cphaprob state

Cluster Mode:   High Availability (Active Up) with IGMP Membership

ID         Unique Address  Assigned Load   State          Name                  

2 (local)  10.0.0.12       100%            ACTIVE         gw02-r77


Active PNOTEs: None

Last member state change event:
   Event Code:                 CLUS-116504
   State change:               READY -> ACTIVE
   Reason for state change:    All other machines are dead (timeout), No other ACTIVE members have been found in the cluster
   Event time:                 Thu Jan 16 10:37:32 2020

Cluster failover count:
   Failover counter:           0
   Time of counter reset:      Thu Jan 16 09:34:50 2020 (reboot).

Next we verify that all our cluster interfaces are up:

[Expert@gw01-r80:0]# cphaprob -a if

CCP mode: Manual (Unicast)
Required interfaces: 3
Required secured interfaces: 1


Interface Name:      Status:

eth0                 UP
eth1                 UP
eth2 (S)             UP

S - sync, LM - link monitor, HA/LS - bond type

Virtual cluster interfaces: 2

eth0           192.168.239.250      VMAC address: 00:1C:7F:00:61:B3
eth1           192.168.20.213       VMAC address: 00:1C:7F:00:61:B3

Once we're satisfied the our new gateway is passing traffic properly, we'll repeat the same procedure to replace the remaining "old" gateways.


Friday, January 17, 2020

Check Point standby cluster member cannot access the Internet


The title is pretty self-explanatory, and it's behaviour I'm seeing on every recent cluster build that I do (R80.10 and up).  A fair question will be "Why are you concerned with Internet access on your standby member?".  Well, my biggest reason is cosmetic, as occasionally the gateway might throw up alerts in SmartConsole due to it being unable to to entitlement checks and such. 

More importantly, your cluster might also be configured to have the gateways pull IPS / AV / etc. updates (as opposed to having your SMS distribute it) and this means that if your cluster fails over, there might be a small window where you are running outdated protections.

Having said all that, how do we fix this?  Well Check Point has 4 steps listed in sk43807, namely:
  • Verify that routing tables are identical on all nodes
  • Synchronise HTTP, HTTPS, DNS between cluster members
  • Set the 'fwha_forw_packet_to_not_active' kernel parameter to 1
  • Edit your 'table.def' file on the SMS

Of those, the only one that has ever worked for me is the 'table.def' edit, issue with that is that it will get overwritten after every upgrade you do, so in my view not a long-term solution.

Because this issue is caused by the gateway's traffic being hidden behind the cluster IP, we can fix it with a NAT rule.  This also has the advantage of being a permanent fix.  You'll have to create a rule for each gateway in your cluster which states that for any traffic originating from the gateway (create objects with your external IP's) to any, use original.  It needs to look something like this:


Once done, push policy and you should immediately restore access.


Monday, January 6, 2020

Checkpoint and QRadar integration via Checkpoint Log Exporter

I recently had to integrate a new client's Checkpoint environment into their QRadar SIEM solution due to the need for a single point of alerting and monitoring.

Despite the information available on both Checkpoint and IBM's support site, I still found the process a tad convoluted.  Below is a short and sweet summary of how I got the Checkpoint to ship logs to QRadar in a way that made sense to QRadar.

Configure the Checkpoint Log Exporter

Execute the below command on your Checkpoint SMS:

cp_log_export add name qradar target-server target-port 514 protocol tcp format leef read-mode semi-unified

Verify LeefFieldMapping.xml

Navigate to /opt/CPrt-R80/log_exporter/targets/qradar

Verify that the LeefFieldMapping.xml file is as per QRadar requirements defined here: https://www.ibm.com/support/pages/troubleshooting-check-point-syslog-leef-events-log-exporter-cplogexport-utility

Verify LeefFormatDefinition.xml

Navigate to $EXPORTERDIR/conf

Verify that the LeefFormatDefinition.xml is as per QRadar requirements defined here: https://www.ibm.com/support/pages/troubleshooting-check-point-syslog-leef-events-log-exporter-cplogexport-utility

Once done, restart the Log Exporter instance: cp_log_export restart name qradar

QRadar Configuration

My testing revealed that there are two pre-requisites required:
  1. Ensure you have the latest QRadar Checkpoint DSM (Device support module)
  2. Install IBM QRadar Custom Properties for Checkpoint from the QRadar App Exchange
Lastly, configure a new Checkpoint Log source (Admin -> Log Sources) which matches the settings you defined in your Checkpoint Log Exporter.

QRadar also supports Checkpoint integration via Opsec, but it seems that the Log Exporter is the preferred way for Checkpoint going forward.

Detailed troubleshooting can be found on the IBM Support site.