Saturday, April 18, 2020

Implementing Secure Client Verification (SCV) on Check Point gateways


Introduction


This post was written whilst organisations were coping with the fallout from the Corona / COVID-19 pandemic.  Organisations were faced with the task of enabling the workforce to work remotely, and to do so securely.  Apart from implementing MFA, device posturing or compliance checking your endpoints is arguably one of the more effective ways of helping to address the risks associated with granting your users access into your network.

Check Point allows us to do this in multiple ways by utilizing a feature called Secure Client Verification (SCV).  In very simple terms, this allows us to perform numerous checks (Is AV running, is the OS supported, is it patched, is it a member of the corporate domain etc.) on an endpoint before we allow it to access our network via a VPN.

SMS Configuration


Go to Global Properties - Secure Configuration Verification
Ensure "Apply Secure Configuration...." is selected

Gateway Configuration


On your Cluster / gateway object, ensure that IPSec Policy Server is selected.


This allows us to add the desktop policy to our policy package, which in turn allows the magic to happen.  Go to Security Policies -> Manage policies and layers.  Ensure "Desktop Security" is ticked.


Publish your changes and navigate to the policy package you just edited.  You'll see you have a brand new "Desktop Policy" in your Access Control section.  Click "Open Desktop Policy in SmartDashboard", making sure to select Read-Write mode.


Navigate to the "Desktop" tab.  We will need to create a rule here, otherwise the policy will fail to install (it's the policy installation that transfers the local.scv file to the gateway, but more on that later).

If you are just running the Check Point Mobile client then whatever you do here will have no impact, as this client does not have a firewall component.  That said, click "Add Rule at the Bottom" and add a rule, anything will do.


If you're running the full client then obviously don't do a rule which puts you at risk, but then you would probably also have rules in place already which obviates the need for this step.

Update the SMS with your changes and exit SmartDashboard


local.scv file details


Now comes the slightly archaic bit.  Your actual compliance rules in this instance are controlled by a text file called "local.scv" that resides on your SMS inside the $FWDIR/conf folder.  I'll include links to more extensive documentation at the end of the post, for this example I'll show how to check for domain membership (checkpoint.root in this example).  The desired outcome will be that if the VPN client is not a member of the checkpoint.root domain, then it will be denied access.

You can either edit the local.scv file in place using the vi editor, or transfer to your workstation and upload the edited file.  Here are the relevant edited sections:


: (RegMonitor
:type (plugin)
:parameters (
:string ("SYSTEM\CurrentControlSet\Services\Tcpip\Parameters\Domain=checkpoint.root")
:begin_admin (admin)
:send_log (alert)
:mismatchmessage ("Your computer doesn't meet the domain membership requirements.")
:end (admin)
)
)


:SCVPolicy (
: (RegMonitor)


:SCVGlobalParams (
:enable_status_notifications (false)
:status_notifications_timeout (10)
:disconnect_when_not_verified (true)
:block_connections_on_unverified (false)
:scv_policy_timeout_hours (168)
:enforce_ip_forwarding (false)
:not_verified_script ("")
:not_verified_script_run_show (false)
:not_verified_script_run_admin (false)
:not_verified_script_run_always (false)
:allow_non_scv_clients (false)
:skip_firewall_enforcement_check (true)
)


Client Output
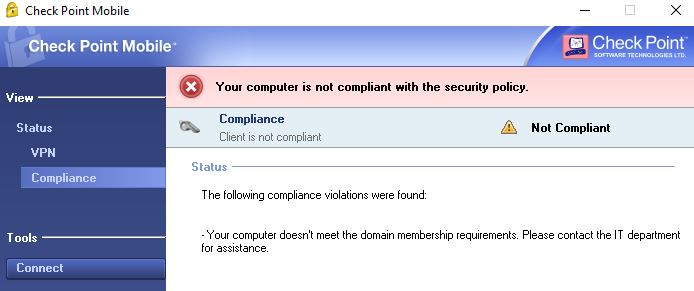

Once the updated file is saved on your SMS, you can push policy to your gateways, making sure the "Desktop Security" is ticked.  When policy installation is done you can attempt to establish a VPN connection to your gateway.  If you are not compliant you will get an error message similar to the below (you can edit the actual error message with the local.scv file)

Conclusion


The advantages to building and configuring Secure Compliance Verification is that you do not need to purchase any additional licenses or install any software beyond the Mobile Client.  The drawbacks, in my opinion is:
1.  Not as fully featured as the checks that can be done with the full Check Point endpoint solution
2.  You cannot have granular SCV rule (i.e. Check Y for UserA, Check Z for UserB)
3.  It's a Global setting enforced from your SMS, so you cannot have separate checks for separate gateways

Having said that, it's an awesome feature that for some reason is not very well-known among Check Point admins.

I found the following resources very helpful when first building this out in my lab:

Check Point sk65267
Check Point sk147416

https://community.checkpoint.com/t5/Remote-Access-Solutions/White-Paper-Check-Point-Compliance-Checking-with-Secure/m-p/57123#M1737


Friday, January 24, 2020

Migrating a Check Point cluster to new hardware

Overview:

The very high-level overview would be:
1. Migrate standby node config to new node
2. Disconnect old standby from network
3. Connect new standby to network
4. Reset SIC via SmartConsole
5. Failover Cluster to new node
6. Repeat steps 1-4 for additional cluster members

Step-by-Step

In order to minimise disruption we'll start by replacing the standby node.  We can verify the node state that with the cphaprob state command:

[Expert@gw02-r77:0]# cphaprob state

Cluster Mode:   High Availability (Active Up) with IGMP Membership

Number     Unique Address  Assigned Load   State

1          10.0.0.11       100%            Active
2 (local)  10.0.0.12       0%              Standby

Now we'll migrate the standby gateway configuration to our new standby node.  We can pull the existing config via the "show configuration" command.  This will dump the configuration onto the console, where you can copy and paste it into a text file:

gw02-r77> show configuration
#
# Configuration of gw02-r77
# Language version: 12.3v1
#
# Exported by admin on Thu Jan 16 09:46:32 2020
#
set net-access telnet off
set core-dump enable
set core-dump total 1000
set core-dump per_process 2
set inactivity-timeout 10
set web table-refresh-rate 15
set web session-timeout 10
set web ssl-port 443
set web ssl3-enabled off
set web daemon-enable on

Etc………………………………….

The next step is very important, as most likely your interface names will be different on your new hardware.  In the below example my source gateway's interface is eth0:

set interface eth0 comments "Management"
set interface eth0 state on
set interface eth0 ipv4-address 192.168.239.253 mask-length 24

If my destination interface is eth5, for example, I'll just do a simple search and replace, which will give me this:

set interface eth5 comments "Management"
set interface eth5 state on
set interface eth5 ipv4-address 192.168.239.253 mask-length 24

This we'll repeat for all interfaces.  Sub-interface names will not change, so you need not worry about those.

Now that we've adapted our config file to reflect our new hardware, we log into the new gateway and paste it in.

Now we are ready to replace our standby node with the new node, so we disconnect our standby node from the network.  To allow for rapid failback in case something goes wrong I never power off the old standby.  Instead I either unplug the cables or I disable the switchports that the gateway is connected to.

Now we can power up the new standby node.  Once bootup is complete we reset the SIC using SmartConsole.  Right click on your gateway object and select edit:


Now click Communications, then Click Reset:


Now enter the one-time password (should match what you entered during gateway setup, otherwise you can change it using cpconfig):


Now we update the cluster properties to the new version (R77.30 -> R80.30 in this instance)


What if my interface names are different?

In the event that your interfaces names are different between your old and your new cluster members, you'll need to match it up by editing your cluster object in SmartConsole and telling it which physical interfaces maps to which cluster interfaces.  This screenshot should explain it better:


Finally we install our policy on the new node only:


Now we fail the cluster over to our new member by running the cphastop command on the remaining "old" node.

We verify that our new member is active:

[Expert@gw01-r80:0]# cphaprob state

Cluster Mode:   High Availability (Active Up) with IGMP Membership

ID         Unique Address  Assigned Load   State          Name                  

2 (local)  10.0.0.12       100%            ACTIVE         gw02-r77


Active PNOTEs: None

Last member state change event:
   Event Code:                 CLUS-116504
   State change:               READY -> ACTIVE
   Reason for state change:    All other machines are dead (timeout), No other ACTIVE members have been found in the cluster
   Event time:                 Thu Jan 16 10:37:32 2020

Cluster failover count:
   Failover counter:           0
   Time of counter reset:      Thu Jan 16 09:34:50 2020 (reboot).

Next we verify that all our cluster interfaces are up:

[Expert@gw01-r80:0]# cphaprob -a if

CCP mode: Manual (Unicast)
Required interfaces: 3
Required secured interfaces: 1


Interface Name:      Status:

eth0                 UP
eth1                 UP
eth2 (S)             UP

S - sync, LM - link monitor, HA/LS - bond type

Virtual cluster interfaces: 2

eth0           192.168.239.250      VMAC address: 00:1C:7F:00:61:B3
eth1           192.168.20.213       VMAC address: 00:1C:7F:00:61:B3

Once we're satisfied the our new gateway is passing traffic properly, we'll repeat the same procedure to replace the remaining "old" gateways.


Friday, January 17, 2020

Check Point standby cluster member cannot access the Internet


The title is pretty self-explanatory, and it's behaviour I'm seeing on every recent cluster build that I do (R80.10 and up).  A fair question will be "Why are you concerned with Internet access on your standby member?".  Well, my biggest reason is cosmetic, as occasionally the gateway might throw up alerts in SmartConsole due to it being unable to to entitlement checks and such. 

More importantly, your cluster might also be configured to have the gateways pull IPS / AV / etc. updates (as opposed to having your SMS distribute it) and this means that if your cluster fails over, there might be a small window where you are running outdated protections.

Having said all that, how do we fix this?  Well Check Point has 4 steps listed in sk43807, namely:
  • Verify that routing tables are identical on all nodes
  • Synchronise HTTP, HTTPS, DNS between cluster members
  • Set the 'fwha_forw_packet_to_not_active' kernel parameter to 1
  • Edit your 'table.def' file on the SMS

Of those, the only one that has ever worked for me is the 'table.def' edit, issue with that is that it will get overwritten after every upgrade you do, so in my view not a long-term solution.

Because this issue is caused by the gateway's traffic being hidden behind the cluster IP, we can fix it with a NAT rule.  This also has the advantage of being a permanent fix.  You'll have to create a rule for each gateway in your cluster which states that for any traffic originating from the gateway (create objects with your external IP's) to any, use original.  It needs to look something like this:


Once done, push policy and you should immediately restore access.


Monday, January 6, 2020

Checkpoint and QRadar integration via Checkpoint Log Exporter

I recently had to integrate a new client's Checkpoint environment into their QRadar SIEM solution due to the need for a single point of alerting and monitoring.

Despite the information available on both Checkpoint and IBM's support site, I still found the process a tad convoluted.  Below is a short and sweet summary of how I got the Checkpoint to ship logs to QRadar in a way that made sense to QRadar.

Configure the Checkpoint Log Exporter

Execute the below command on your Checkpoint SMS:

cp_log_export add name qradar target-server target-port 514 protocol tcp format leef read-mode semi-unified

Verify LeefFieldMapping.xml

Navigate to /opt/CPrt-R80/log_exporter/targets/qradar

Verify that the LeefFieldMapping.xml file is as per QRadar requirements defined here: https://www.ibm.com/support/pages/troubleshooting-check-point-syslog-leef-events-log-exporter-cplogexport-utility

Verify LeefFormatDefinition.xml

Navigate to $EXPORTERDIR/conf

Verify that the LeefFormatDefinition.xml is as per QRadar requirements defined here: https://www.ibm.com/support/pages/troubleshooting-check-point-syslog-leef-events-log-exporter-cplogexport-utility

Once done, restart the Log Exporter instance: cp_log_export restart name qradar

QRadar Configuration

My testing revealed that there are two pre-requisites required:
  1. Ensure you have the latest QRadar Checkpoint DSM (Device support module)
  2. Install IBM QRadar Custom Properties for Checkpoint from the QRadar App Exchange
Lastly, configure a new Checkpoint Log source (Admin -> Log Sources) which matches the settings you defined in your Checkpoint Log Exporter.

QRadar also supports Checkpoint integration via Opsec, but it seems that the Log Exporter is the preferred way for Checkpoint going forward.

Detailed troubleshooting can be found on the IBM Support site.


Thursday, November 8, 2018

Migrating policies from a standalone Checkpoint gateway to a new management server

I was recently faced with an interesting scenario.  A customer had a standalone Checkpoint gateway running R80.10 and wanted to migrate to a distributed configuration, with separate management.  I researched how to do this and was surprised with the lack of clear answers.

A lot of the online solutions here either refer to KB's which explicitly state that the KB does not apply to R80.10 that a migrate export should suffice.  In my experience it doesn't, it errors out explicitly stating that: "Database migration between Standalone and Management only machines is not supported".

Below is then the process I used to migrate my policies (firewall, NAT and Threat Prevention).

Requirements:

We'll need the CheckPoint API Python Development Kit:
https://github.com/CheckPointSW/cp_mgmt_api_python_sdk
And the CheckPoint Policy Import and Export tool

Lastly, make sure that your gateway and management servers are on the latest GA Jumbo Hotfix Accumulator.  This will ensure that there are no Python compatibility issues.

Download and Extract both on your Computer, using the d:\CP_Python folder for this example I then end up with this structure:
D:\CP_PYTHON
├───cp_mgmt_api_python_sdk-master
│ ├───examples_python2
│ ├───examples_python3

Now we need to move all files and folders under the d:\CP_PYTHON\cp_mgmt_api_python_sdk-master folder to the d:\CP_PYTHON\cp_mgmt_api_python_sdk folder.

Our folder structure then looks like this:
D:\CP_PYTHON
├───cp_mgmt_api_python_sdk-master
└───ExportImportPolicyPackage-master
├───cp_mgmt_api_python_sdk
│ ├───examples_python2
│ ├───examples_p
│ └───lib
└───ExportImportPolicyPackage-master
├───cp_mgmt_api_python_sdk
├───exporting
└───importing
python3
│ └───lib
├───exporting
└───importing

The next step is to transfer the ExportImportPolicyPackage-master folder to both our source and destination CheckPoints. In this case I've transferred to the /tmp folder on each.

[Expert@source1:0]# pwd
/tmp/ExportImportPolicyPackage-master

Now we execute the actual script, like so:

[Expert@source1:0]#/opt/CPsuite-R80/fw1/Python/bin/python2.7 /tmp/ExportImportPolicyPackage-master/import_export_package.py

An interactive menu system will appear, from here make sure to specify:
- Output filename
- Layer to be exported
- Whether you want to export Threat-Prevention Layers

If you just specified a filename, your export can be found under the /tmp/ExportImportPolicyPackage-master/ folder. Now transfer this file to your destination management server.

In this instance I've transferred it to my /tmp folder.  If this is a new management server, I always delete the built-in Standard Layer, as I've found that the NAT rules import is a bit all over the show otherwise.

This you do under Security Policies -> Manage Policies -> Manage policies and Layers. Delete and publish your changes.

On the destination gateway we now execute the script, just like we did on the source:

[Expert@dest1:0]#/opt/CPsuite-R80/fw1/Python/bin/python2.7 /tmp/ExportImportPolicyPackage-master/import_export_package.py

Once again, an interactive menu system will appear, from here make sure to specify:
- Import a Package
- Enter user credentials manually
- Specify custom name for imported package (I use Standard, remember to delete the built-in as per above)
- Run

The script will now:
- Create a Policy Package
- Import services
- Import objects
- Import access-layers
- Import access-rules
- Import NAT rules
- Import threat-layers
- Import network
- Import hosts
- Import threat-profiles
- Import groups

If you connect to the management server with SmartConsole, you should see all the above reflected.

Tuesday, May 16, 2017

Protecting against a ransomware attack


Wikipedia describes ransomware as “a type of malicious software that carries out the cryptoviral extortion attack from cryptovirology that blocks access to data until a ransom is paid and displays a message requesting payment to unlock it.” 

In Layman's terms, it denies you access to your own files until you pay the ransomware creators to unlock your files. This extortion method has proven to be very profitable, with CryptoLocker and CryptoWall netting their creators U$3 million and US$17 million respectively.

Ransomware attacks are typically carried out by a Trojan, where the user is tricked into opening a seemingly legitimate attachment or document. Once activated, the ransomware will spread by exploiting vulnerabilities on the target systems. Once a system has been compromised and the files encrypted the victim will be issued with instructions on how to unlock the files - unlocking methods invariably involves paying the ransomware creators via hard-to-trace channels such as Bitcoin.

Whilst the result of a ransomware attack may be devastating, there are a lot of measures that one can take to protect your organisation. I will give a brief overview of these methods below. Do note that attacks, and indeed defense mechanisms, are constantly evolving. Thus the measures below are in no way exhaustive, but should be seen as a very strong baseline to work from.


Secure your perimeter

Your first line of defense is crucial. As such you need to make sure that a Unified Threat Management (UTM) firewall is part of your perimeter security solution. This will allow you to activate measures such as Anti-Virus and Malware scanning as well as Intrusion Detection and Prevention Systems (IDS / IPS). A UTM firewall will also allow you to configure outbound filtering, which will prevent any "phone-home" communication between a compromised system and its command-and-control servers.


Secure your E-Mail

E-Mail is one of the most prevalent attack vectors, so it just makes sense to invest significant effort to secure it. Start off by enable strong spam filters to prevent phishing and other similar forms of attack from reaching your users. You should furthermore look at implementing methods to authenticate inbound mail, these include technologies such as Domain Message Authentication Reporting and Conformance (DMARC), DomainKeys Identified Mail (DKIM) and Sender Policy Framework (SPF). All these technologies complement each other and works together to detect and prevent mail spoofing. Of course you also need to make sure you are scanning all mails for viruses and, last but not least, filter all executable and "bad" file types.


Patch Management

Most ransomware propagates by exploiting Operating System Vulnerabilities. Point in case is the WannaCry variant which utilizes the EternalBlue exploit, which was actually patched by Microsoft two months before the first attacks hit. This clearly demonstrates the value of patching. Ensure you have a proper patch management strategy in place and that systems are patched timeously.


Endpoint Anti-Virus

This goes without saying - always ensure that your anti-virus (AV) solution is up to date and that real-time scanning is enabled. Apart from that you'll also need to configure it to perform regular scheduled scans. Most AV solutions now also include heuristic technologies, which allows it to detect and remove threats for which there are no signatures yet, make sure you utilize this. Lastly, ensure that the endpoint's firewall is activated if provided as part of your AV solution.


Implement Least Privilege

Limit the use of administrative privileges to a minimum and also make sure that User Access Control (UAC) is activated. The principle of Least Privilege should also be applied when granting users access to network resources. Only give write permissions to users that absolutely need those permissions. Default to read only permissions when possible. You should also regularly audit your file shares and review the needed permissions for each share. Ransomware will typically enumerate all network resources an infected system has access to and then encrypt those resources. You can significantly reduce the impact of Ransomware by limiting user access to network resources and just granting them access to what they actually need.


Block file execution from certain paths

Ransomware generally executes from temporary folders located in Windows AppData folders. To protect against this you should configure a Software Restriction Policy to prevent executable files from running out of the %APPDATA% location. A much more exhaustive list can be obtained here.


Implement Geo-Blocking and blocking of known bad IP addresses

If possible for your organisation you should configure your perimeter firewall to block traffic to "at-risk" countries if you do not do business in these countries. For example a large percentage of Ransomware variants rely on communication with Russian IP blocks to function and spread. Protection mechanisms such as these are admittedly crude, but can be surprisingly effective. Furthermore if your perimeter solution allows you to do so, you should explicitly block all traffic to known bad IP addresses.


Application Whitelisting

Application whitelisting is perhaps the most effective method of protecting against ransomware attacks. The flip side is that it also typically takes the most effort and resources in terms of testing, implementing and maintaining.  There are various solutions available to implement application whitelisting, but as a start you should consider the AppLocker and Software Restriction Policies native to Windows.


Disable MS Office Macros

Many variants of Ransomware leverage Macros to propagate. If possible you should disable this functionality within Office documents, or at the very minimum for documents received via mail and downloaded from the Internet. Alternatively you can make use of the Office File Viewer to view these untrusted documents.


Enable Filescreen

Windows FileScreen was a popular method to detect ransomware infections, however its functionality has been greatly reduced because of new ransomware variants randomizing file extensions. It might still add value in your organisation and assist with alerting and tracing the origin of a ransomware outbreak. A fairly comprehensive list of file extensions can be found here.


Enable Logging (SIEM)

A proper logging solution will be invaluable in tracing the origin of a ransomware outbreak. The value in a SIEM solution is that you will be able to correlate the logs of a multitude of different devices to find out how the attack happened. This in turn will allow you to take measure to prevent a re-occurrence. A properly configured SIEM solution will also act as an efficient early-warning system, which will allow you to limit the spread and fallout of a ransomware infection should you be compromised.


Backups

If all else fails your backups will be what stands between you and disaster. Back up your data regularly, as per your organisation's Recovery Point Objective's (RPO). Verify the integrity of those backups and test the restoration process regularly to ensure it is working. You also need to secure your backups, or at the very least take them offline so that it cannot be affected by the same ransomware you are trying to protect against.

Configuring FortiGate IPS to block WannaCry ransomware

I’ll split this up in two scenarios – the first being where there is no IPS being done yet and you just want to block WannaCry, and the second being where you already have IPS measures in place protecting to your clients

No IPS in place yet

  1. Create an IPS protection profile containing the MS.SMB.Server.SMB1.Trans2.Secondary.Handling.Code.Execution signature
  2. Ensure that the protection profile is set to Block
  3. Apply the IPS signature to all policies governing your intra-VLAN traffic

Adding the WannaCry signature to your existing client targeting IPS profile

The target type for this signature unfortunately has the target type Server, even though client OS’s are also being targeted.  This means you’ll have to manually add it to your client-targeting IPS profile.

Another point to note is that it is listed as a Rate-based signature, so ensure that your signature has a threshold of zero.

Here is more information about the relevant signature from Fortinet: https://fortiguard.com/encyclopedia/ips/43796

Monday, January 9, 2017

Configuring password expiration for FortiGate users


A FortiGate device allows you to create a password policy for administrative accounts via the web interface.  Unfortunately this functionality is not exposed for normal, local user accounts.  Typically this isn't a big pain point as I would imagine that most customers would make use of external authentication (FSSO / LDAP / Radius etc.).  That said, I recently had a situation where a client had a bunch of local users configured and they wanted to implement password expiry, with users being prompted to change passwords upon expiry.  Authentication was done via Captive Portal.

The FortiOS handbook came up blank, but a chat with my Fortinet SE provided me with a solution.  First we need to configure the actual policy, then apply it to a user account. 

The password policy is configured like so:

config user password-policy
edit "pwpol01"
set expire-days 2
set warn-days 1
next
end

We then apply it to a user:

config user local
edit "user01"
set type password
set passwd-policy "pwpol01"
next
end

Unfortunately password policies can only be applied to users, and not to groups, so it is a bit of a pain if you have lots of users, although in that use case you will be better off using external authentication or FortiAuthenticator.  When the configurable number of days has been reached, the user will be prompted via their captive portal to renew their password before the expiration day is reached.

Friday, November 18, 2016

Becoming a Payment Card Industry Professional (PCIP)


I am very proud to say that I now hold the Payments Card Industry Professional (PCIP) certification. This is a journey that took me about 6 months to complete and I'll share some tips and experience I've picked up on my way to becoming certified.

The registration process starts by submitting your application as well as supporting documentation to the PCI Council via their website. The approval typically takes about two weeks and it might be that they ask you for proof of work experience and additional security certifications. In my case I've been fortunate to have about a decade of experience in the InfoSec field in general, and 3 years working for clients who need to be PCI-DSS compliant.

What do you need to do?

Once your application is approved you need to attend the PCIP course. This can be either on-line or classroom based. If you are new to the PCI-DSS field I would strongly suggest attending the classroom training, as access to the instructor as well as conversing with peers in the industry can be invaluable. If you have PCI-DSS experience then the on-line course will suffice.

Once you have completed the course, the PCI Council will register a user ID for you on the Pearson Vue website and provide you with a voucher to take the exam. It is up to you to do the booking on the Vue website. It is important to note that you have to use this voucher within 30 days of your training. If you fail the exam you can book to take it again at your own cost. If, heavens forbid, you fail it a second time you will have to attend the PCIP course again.

Preparing for the exam

First and foremost, know the PCI-DSS 3.2 Standard inside out. You do not have to know things like requirement 3.2.1 states that etc. You will however need to know how to successfully meet every requirement. In my case there was also a strong focus on the various Self-Assessment Questionnaires (SAQs) and in which cases they would be applicable. I was not tested on Reports of Compliance (ROC) or Attestation of Compliance (AOC) at all.

You should also know when encryption, strong cryptography, hashing, tokenization and masking should be used as well as the difference between all these. Make sure you know exactly when Compensating Controls are allowed, as well as what are the requirements for acceptance of those. I got maybe one or two question from the supplemental (Virtualization and TLS specifically). You don't have to study them in depth, but do read through them and understand the intent.

Next Steps

I find assisting our clients on their path towards PCI-DSS compliance to be an extremely challenging and rewarding endeavour. As such, the next step on my journey is to become a PCI Internal Security Assessor. I believe this will add tremendous value over and above that which we already provide to our clients in the financial services sector.

Thursday, November 17, 2016

Mitigating the BlackNurse exploit on Cisco and Fortigate equipment


"Blacknurse is a low bandwidth ICMP attack that is capable of doing denial of service to well known firewalls.  Most ICMP attacks that we see are based on ICMP Type 8 Code 0 also called a ping flood attack. 

BlackNurse is based on ICMP with Type 3 Code 3 packets. We know that when a user has allowed ICMP Type 3 Code 3 to outside interfaces, the BlackNurse attack becomes highly effective even at low bandwidth. 

Low bandwidth is in this case around 15-18 Mbit/s. This is to achieve the volume of packets needed which is around 40 to 50K packets per second. It does not matter if you have a 1 Gbit/s Internet connection." – as per http://blacknurse.dk/ 

Securing Fortigate

Andras the Techie created an Fortigate IPS signature to detect and drop this traffic:

config ips custom
    edit ICMP.Blacknurse
      set signature "F-SBID( --name \"ICMP.Blacknurse\"; --protocol icmp; --icmp_type 3; --icmp_code 3; --rate 250,1;)"
        set severity medium
        set location server
        set application Other
        set action block
        set status enable
end

His blog post also contains instructions on how to apply it to you policies.

Securing Cisco

Best is of course to filter this traffic upstream, before it hits your firewall.  This is what you’ll need to do on an Cisco IOS router:

config t
ip icmp rate-limit unreachable 100 1000
do copy run start
end

For Cisco IOS-XR you will need to do this:

icmp ipv4 rate-limit unreachable 2000
commit

Thursday, November 5, 2015

Changing the case of a Windows hostname

Naming convention is something that I’m very particular about and one thing that has always bugged me is if hostnames are not the same case.  In the Windows world there is no functional difference between upper and lowercase hostname, but it’s still enough to bother me.

To change the case is surprisingly easy.

First we log onto “Active Directory Users and Computers” and enable the “Advanced Features” which lives in the View menu.

image

Double-click the offending hostname and go to the “Attribute Editor”.  Scroll down to the dNSHostName and change the case.

image

The change will take effect as soon as you reboot the host in question.

Wednesday, November 4, 2015

Cisco traceroute status codes

Just a quickie.  Cisco routers can give seemingly weird (especially if you’re coming from the Windows world) traceroute outputs.  This is something that I did not see documented in either the CCNA or CCNP training guides.

In Cisco routers, the codes for a traceroute command reply are:
! -- success
* -- time out
N -- network unreachable
H -- host unreachable
P -- protocol unreachable
A -- admin denied
Q -- source quench received (congestion)
? -- unknown (any other ICMP message)

For further reading refer to the IBM AIX documentation – as far as I can make out the AIX codes applies to Linux as well.

Friday, October 30, 2015

Setting up a Cisco port-channel

Setting up port-channels on a Cisco switch can sometimes be a real PITA due to your interface settings having to match the port-channel settings.  I’ve come up with a way to eliminate the config mismatches, which I’ll describe below.

First we clear the configuration on the interfaces that we’re going to add to our port-channel by doing a “default int gi1/1/1

Then we add our interfaces to the port-channel and only then do we configure our port-channel, like so:

int gi1/1/1
channel-group <x> mode active
!
int gi2/1/1
channel-group <x> mode active
!
int po<x>
switchport mode trunk
switchport trunk allowed vlan 10,50,...
switchport trunk native vlan 999

This forces your interfaces to join the port-channel before any configuration is added to them. It also reduces the mistake of having mismatched configuration on both interfaces, which could cause independent members in your port-channel.

Thursday, October 29, 2015

FortiAP does not broadcast on 5Ghz Radio–shows channel 0

I recently had a problem where a customer’s FortiAP 221C AP’s would intermittently stop broadcasting the SSID’s assigned to the 5Ghz Radio.

I had a look at the FortiAP profiles and saw that all channels were selected, including channels 149, 153, 157, 161 and 165.  I deselected those so that my configuration was as per below:

image

Once I did that the AP’s started broadcasting on 5Ghz again.  Not sure yet if this is a regulatory limitation due to my country code (ZA) or a bug.

Thursday, December 18, 2014

sys diag kill command does not kill processes on a Fortigate

I recently had a Fortigate 1500D become bogged down due to the reporting daemon (reportd) utilizing 100% CPU.  I will not go into a lot of detail about diagnosing performance issues, as that is not the topic of this post.  Suffice to say that you’ll need to run the following commands to determine which process is misbehaving:

#get sys perf status
#diag sys top
#diag hard sys mem

Typically one would kill and respawn the offending process with the following command, where process_id is obtained via the diag sys top command.

#diag sys kill 11 process_id

Unfortunately in this case the kill command did not actually kill the process, and a reboot was not an option.  Fortunately I once had a remote session with Fortinet TAC where I saw them using some hitherto unknown (to me) commands.  So what follows is an unsupported way to absolutely kill processes dead.

The command we use is fnsysctl.  This command allows us access to a subset of Linux utilities, like cat, ls, kill etc.  In this case we’re interested in the kill command:

#fnsysctl kill –9 process_id

I have never had this command fail to kill a process, although I would recommend only using it as a last resort.

Happy Hunting!

Monday, December 15, 2014

Fortigate SSL VPN on multiple interfaces

There is an potential issue when setting up SSL VPN to listen on multiple interfaces on FortiOS 5.2.2 (have not tested on earlier versions).  When you create the first SSL VPN listener the Fortigate will automatically create a policy to allow SSL VPN traffic.  Due to the way the information is presented one can be excused for thinking the unit will do it for additional listeners as well.  The screenshot below shows how it looks when SSL VPN is enabled on multiple interfaces via the GUI:

 image

These are the relevant bits taken from the configuration file:

config vpn ssl settings
    set idle-timeout 900
    set tunnel-ip-pools "SSLVPN_TUNNEL_ADDR1"
    set tunnel-ipv6-pools "SSLVPN_TUNNEL_IPv6_ADDR1"
    set source-interface "MTN" "MTC"
    set source-address "all"
    set source-address6 "all"
    set default-portal "tunnel-access"
        config authentication-rule
            edit 1
                set source-interface "MTN"
                set source-address "all"
                set groups "VPN"
                set portal "full-access"
            next
        end
end

From the above it is clear that the listener has been added, but the authentication rule has not been updated.  The fix is simple, just add an additional authentication rule via the CLI:

config vpn ssl settings
config authentication-rule
            edit 2
                set source-interface "MTC"
                set source-address "all"
                set groups "VPN"
                set portal "full-access"
            next
        end
end

Your SSL VPN clients will now be able to connect on all interfaces specified in the GUI.

Wednesday, September 3, 2014

Symantec Data Loss Prevention Implementation Strategy

Data Loss Prevention (DLP) is fast becoming an key element in protecting an organization's data.  Access to information is critical to an organizations success, conversely the consequence of a data loss incident has never been higher than now. 

Despite the hefty price tag, a DLP solution often proves to be a relatively easy sell (we protect *all* your data against electronic leakage!).  Whilst a successful implementation can achieve those lofty goals, the devil is in the details. 

The most important requirement is to have complete buy-in from the business, in fact achieving a successful implementation will be absolutely impossible without input from all the stakeholders.  Secondly we need to realize that any DLP solution is an iterative process.  Lastly we need to have a proper implementation plan in place and this will be the focus of this post.

High-Level Process Overview

Identify Confidential Data and Data at Risk (Phase 1)

Create Policies (Phase 2)

Discover Data-at-Rest (Phase 3)

Protect the Endpoints (Phases 4 - 6)

Protect Data-at-Rest and Data-in-Motion (Phases 7 - 8)

Remediation and risk reduction (Phase 9)

Breakdown of Phases

Phase 1 - Identify Confidential Data

During this phase we will train DLP to indentify data that is critical and confidential to the business.

  1. Involve relevant relevant stakeholders (compliance and risk officers, Heads of Departments, IT) to assist in identifying confidential data.

  2. Obtain sample data based on the above

  3. Introduce the sample data into the DLP Solution

    1. Sample data population for Exact Data Matching techniques (EDM) based policies

    2. Sample data population for Described Content Matching (DCM) based policies

    3. Sample data population for Indexed Data Matching techniques (IDM) based policies

    4. Submission of of positive and negative samples for Vector Machine Learning (VML)

Phase 2 - Policy Creation

  1. Identify reporting an alerting audience

  2. Create policies to alert based on the datasets submitted in Phase 1

Phase 3 Enable Data-at-Rest / Network Discover

During this phase we will enable the Network Discover component of Symantec DLP.  This allows us to scan data repositories on the LAN (File Servers / NAS's etc.) for policy violations.  We will only alert the DLP team during this phase.

  1. Deploy Symantec Data Insight (if purchased as part of the DLP Suite) to assist with identification of data owners, as well as to monitor and log permissions and data accesses by end-users.

  2. Configure Data Insight / DLP integration which will enable DLP to infer data owners based on intelligence gained from Symantec Data Insight.

  3. Consult with stakeholders to identify all relevant data repositories on the network

  4. Initiate a Network Discover scan of all the data repositories based on the previously created EDM, DCM, IDM and VML policies.

  5. Re-iterate the process to fine-tune the policies and EDM, DCM, IDM and VML data-sets

  6. Enable alerting to the relevant stakeholders and re-iterate based on feedback

Phase 4 - Pilot Deployment - Endpoints

During this phase we will only be monitoring.  Alerts will only be sent to the DLP team - no end user alerting or notification.

  1. EDM Policy Implementation for pilot group

  2. DCM based Policy Implementation on for pilot group

  3. IDM based Policy Implementation for pilot group

  4. Re-iterative review of DLP policies, EDM, DCM, IDM and VML data based on alerting and reporting

Phase 5 - Enable Prevent Mode for Pilot Group

During this phase we will actively start blocking and alerting on the endpoints.  Both the end-users and the DLP team will receive alerts and notification.  We will depend heavily on end-user feedback to further streamline our DLP policies.

  1. Enable end-user notification

  2. Fine tune DLP policies based on end-user feedback as well as alerts

  3. Fine tune EDM, DCM, IDM and VML data based on end-user feedback

  4. Re-iterate the process to reduce false-positives

  5. Enable alerting to relevant stakeholders (Data owners, Heads of Departments etc.)

Phase 6 - Roll out the Endpoint Agent to all users

During this phase we will roll-out the DLP endpoint agent to all users.  Our policies and confidential data has been thoroughly fine-tuned so we can safely enable end-user alerting as well.

  1. Ideally we should provide the end-users with DLP / Security awareness training during this phase

  2. Deploy the DLP endpoint agent via the organization's preferred deployment mechanism (GPO / SCCM / Altiris etc.)

  3. Further fine-tuning of policies and EDM, DCM, IDM and VML data-sets based on alerting and end-user feedback

Phase 7 - Enable Data-at-Rest / Network Prevent

During this phase we will activate the blocking mode of the Network Prevent component.  This will involve quarantining, copying, encrypting and/or applying DRM to sensitive and confidential data existing on your data repositories.  Alerting will be to the DLP team as well as the relevant stakeholders.

  1. Verify all Data repositories configured within DLP during Phase 5

  2. Create the necessary FlexResponse rules to automatically respond to incidents.

  3. Actions include quarantining, copying, encrypting and/or applying DRM

  4. Add the FlexResponse rule to your policies

  5. Scan your data repositories

Phase 8 - Deploy Network Monitor and Network Prevent for Email and Web

During this phase we deploy the Network Monitor component, which operates via a mirror / SPAN port to capture Data in Transit incidents.  We will also deploy the Web and Email DLP components.  Alerting will be done to the the DLP team as well as the relevant stakeholders.

  1. Install the physical DLP Network Monitor Server (This server cannot be virtualised as per Symantec)
  2. Integrate the DLP Network Prevent for Email component with your existing MTA (DLP can operate in either Reflecting or Forwarding mode)
  3. Integrate the DLP Network Prevent for Web component with your existing proxy server.  (The proxy server needs to act as an ICAP client to DLP.  Symantec DLP supports both the REQMOD and RESPMOD modes of ICAP)

  4. Further fine-tuning of policies and EDM, DCM, IDM and VML data-sets based on alerting

Phase 9 - Ongoing remediation and reporting on risk reduction

This phase will be perpetual.  As incidents occur they will be re-mediated, and reporting to the relevant stakeholders will be set up and adjusted as necessary.  Your DLP solution is now fully deployed, and your policies and EDM, DCM, IDM and VML fingerprints will be continuously updated by the DLP team as business data changes over time.

Monday, September 1, 2014

How to enable Windows Server 2008 R2 to issue SAN certificates

The Certificate Authority in Windows 2008 R2 cannot issue Subject Alternative Name certificates in it’s default configuration.  Therefore if you include a SAN entry (like for Exchange) the CA will issue your certificate, but omit all the SAN entries

To allow your CA to issue SAN certificates you need to run the following from an administrative command prompt:

certutil -setreg policy\EditFlags +EDITF_ATTRIBUTESUBJECTALTNAME2
net stop certsvc
net start certsvc

This is not necessary on a Windows 2012 and above.


Wednesday, August 27, 2014

Symantec Data Insight 4.5 Overview

Symantec recently released version 4.5 of their Data Insight product.  In a nutshell, Symantec Data Insight allows an organization to:

  • Identify who works with and owns their data
  • Understand what unstructured data they have
  • Maintain regulatory compliance for information access, use and retention
  • Ensure information is protected from exposure to unauthorized individuals
  • Review permissions on data and suggest changes

What’s New?

  • Self-service portal allows data owners to remediate incidents directly without necessarily involving IT.
  • Reporting enhancements
  • Deep integration with Symantec Enterprise Vault and Symantec Data Loss Prevention
    • Data Insight can infer ownership of a file and then add that intelligence to Symantec DLP
    • Allows you to utilise Symantec EV’s file archiving and retention management capabilities when remediating incidents

To sum it all up, if you need to reduce the effort you spend on securing your data, enhance your data protection levels as well as achieve / prove compliance then Symantec Data Insight will go a long way to assist you in achieving those goals.

Thursday, August 14, 2014

My Customer Service Rules

I've spent the last decade of my career dealing with customers, both directly and indirectly.  I've made my fair share of mistakes, and I also did a lot of things right.  Whilst I still have a lot to learn about customer service (I am technical, not sales after all) I also have some rules that I believe one should unflinchingly abide by.  These are, in no particular order:

  1. Never lie.  Not to your customers, not to your colleagues, not to anyone.
  2. If you make a mistake, be accountable.  Everyone makes mistakes and most people of worth respect and appreciate honesty.
  3. The quickest way to lose the respect of your peers and customers is to point fingers and trying to apportion blame.
  4. Get to know your customer and their business.
  5. Listen.  Understand the problem from the customer's point of view, not just a technical one.
  6. You expect to be paid like a professional, so act like one.  Do not become too "friendly" with the customer and do not swear in front of them. Ever.
  7. "It's not my problem" does not exist in your vocabulary.  If it's not within your domain then help the customer resolve it by roping in someone who can.
  8. Always notify the customer when you are about to make changes.  E-Mail is only sufficient if the customer acknowledges the mail, otherwise follow up with a phone call.
  9. Only stick to the communicated changes.  If you tell the customer you're rebooting the mail server, do not reboot the file server as well.
  10. In that vein, always make sure your customer does not get caught by surprise by always communicating updates.
  11. Stick to your appointments - if you say will show up at 9 then you show up at 9.  If you can't then you let the customer know in advance via a phone call - e-mail is not acceptable.
  12. Share your knowledge with the customer.  This will not make you redundant, it will allow you to provide value further up the chain.
  13. You exist to serve the customer and their needs (within reason).
  14. Speak to your customers often, no less than once a month.  In the services industry "Out of sight, out of mind" holds very true.
  15. Always protect yourself, the customer and your relationship by agreeing on things up front.  This includes costs, scope of work and handover / success criteria.  Do not negotiate these after the fact.
  16. Whenever possible work for and with people you respect. When you do, even the stressful times are easier to deal with.
  17. Pre-sales is an art, and the paint brush is 'why.'  Keep asking until you get to the root.
  18. Never, ever, bad-mouth another customer or vendor in front of a customer.  Always focus on and sell your strengths.
  19. Lastly, no-one who ever bought a drill needed a drill...they needed to make a hole.  I cannot stress enough how important this concept is.